22 Spanish Lesson Plans for Beginners

Picture a room full of beginner Spanish students. All eyes are on you, the teacher, as the first class of the term is about to start.
No need to throw in a bunch of grammar terms or complicated instructions. Your students also don’t need to be pros at speaking Spanish individually yet. All of this will come in time. Read on for 22 Spanish lesson plans and ideas you can use in your classroom from the first few days.
Contents
- Spanish Lesson Plans
- Spanish Lesson Activity Ideas
- Create a “Langspo” board
- Rearrange desks for different lessons
- Cover a wall with real-world Spanish examples
- Make a Spanish hand collage
- Have students create visual flashcards
- Ask students to create their own Spanish videos
- Use art and graphic organizers
- Have students decorate their notes
- Color code concepts
- Cut up old Spanish magazines
- Incorporate songs into the lesson
- Have students read and talk out loud
- Consider recording lessons or activities
- Act out words or sentences
- Get active with games
- Use Total Physical Response (TPR) activities
- Create learning stations in your classroom
- And One More Thing…
Download: This blog post is available as a convenient and portable PDF that you can take anywhere. Click here to get a copy. (Download)
Spanish Lesson Plans
You’ve all just met, and your students are only starting to learn a new language. Just as you aren’t the perfect teacher yet, they may need to fail a dozen times before they understand.
Remember, as with anything, practice makes perfect. That includes both teaching and learning a language. These Spanish lesson plans for beginners will ensure you’re all on the right track to success!
The Alphabet
Lesson goal:
To teach the students the Spanish alphabet and the correct pronunciation of each letter, both by itself and in a word.
Lesson plan:
Give your students a worksheet with the alphabet printed on it. Ideally, it will have some sample words for each letter.
Read each letter out loud and ask the class to repeat after you as a group. Once you’ve introduced the whole alphabet, explain each of the complicated Spanish letters and sounds. Provide plenty of sample words and have students repeat each word aloud.
After they know the letters and can pronounce them correctly, you can try asking individual students to read one word from the word list you’ve prepared to help them practice.
Resources:
- Download presentations or worksheets here, which you can also use for introducing the sample words.
- Check out this alphabet lesson with videos, flashcards and quizzes you can use during class to spice things up.
- Try these alphabet and pronunciation videos from Spanish Made Easy and Butterfly Spanish:
Numbers
Lesson goal:
To teach the Spanish numbers up to 100 and their correct pronunciation.
Lesson plan:
Present the numbers in Spanish to your students. Ask them to repeat after you, then read each number from one to 10 out loud. Repeat as necessary, then continue onto 11 to 20 in the same fashion.
When you reach 20, ask two or three students to recite a few random numbers in Spanish. Do this until the whole group feels comfortable with the first 20 numbers.
Read numbers 21 to 30. Explain that these numbers are written as a single word, but this will change after 30. Proceed to read numbers 31 to 40, then have them practice the first 40 numbers as you did before.
Now read numbers 50, 60, 70, 80, 90 and 100. Tell your students that the rules that apply for numbers 31 to 39 also apply here, and ask for volunteers to tell you random numbers until you’ve covered them all.
Resources:
- I always use Teachers Pay Teachers to get inspiration and materials for my number classes.
- My favorite way of ending the class is by playing some fun number games.
Greetings and Farewells
Lesson goal:
To teach students how to pronounce and use Spanish greetings and farewells correctly.
Lesson plan:
Note: You can either divide this lesson into two class periods (one for greetings and one for farewells) or do both topics together.
Write all the expressions on the board, classified by the time of the day they’re used in Spanish. If there’s a word or expression that can be used in more than one context, include it in each category.
Read each greeting and farewell out loud and ask your students to repeat after you. Repeat each expression a couple times and explain when it’s used and in what contexts, as well as when it should be avoided. Pay special attention to the times of the day as well as to the formal and informal context of each.
Next, have your students work in pairs to put the new vocabulary into practice by writing short, simple dialogues. Encourage them to use any other words, expressions or questions they know from other lessons.
Resources:
- You can print out a list of greetings like this one to give students something they can read while they listen and practice.
- If students have access to computers or laptops, they can practice with memory games or this Spanish situation game.
Days and Months
Lesson goal:
To teach students the days and months, as well as questions related to this new vocabulary, such as ¿Qué día es hoy? (What day is today?) or ¿En qué mes estamos? (What month is it?).
Lesson plan:
Note: This lesson can either be divided into two separate sessions or two halves of one class period.
Start by handing out some printables containing the days of the week. Bearing in mind the Spanish order (from Monday to Sunday), carefully pronounce each day and ask your students to repeat after you.
This is a perfect time to mention that, except for sábado and domingo, the Spanish days end in -es and are invariable in the plural. You can also teach them what an esdrújula word is (accent on the third-to-last syllable) and use the days miércoles and sábado as examples.
To practice the days of the week, you can use any of the worksheets and games included in the Resources section.
The second day or second half of the lesson will cover the months of the year. Use the same class structure (printable, reading, repetition, interesting facts, exercises/games).
Some fun facts for the months include: they’re all masculine in Spanish; they’re never written with a capital letter; septiembre, octubre, noviembre and diciembre derive from the ordinal numbers because they used to occupy these positions in the calendar.
Resources:
- You can find a lot of resources for the days of the week on RockAlingua.
- SpeakingLatino offers plenty of material, from songs to presentations to worksheets.
- There’s also PowerPoint presentations on Tes.com and 123 Teach Me’s interactive lesson, which includes pronunciation, grammar and vocabulary exercises.
Definite and Indefinite Articles
Lesson goal:
To introduce definite and indefinite articles to students for the first time.
Lesson plan:
Note: While this is a beginner’s topic, make sure you don’t do this lesson the first day of class. I recommend something like the fourth lesson so students have had time to get used to the sound of Spanish first.
The best approach to teaching definite and indefinite articles is to divide them into two completely separate lessons.
Start with the definite articles, reading them out loud and telling your students that each Spanish word is either masculine or feminine, both in singular or plural form. As a result, Spanish has four definite articles instead of one.
This is the perfect moment to introduce the topic of Spanish gender to your students, if you haven’t already.
After you’ve introduced the articles, engage your students in a guessing game. Write one word for each student on the board and invite them to guess the words’ gender and correct article.
During the next lesson, use the exact same approach to teach indefinite articles. You probably won’t need to explain gender in depth again, so use that extra time to do some practice exercises instead.
Resources:
- This site has lots of practice for definite and indefinite articles (or anything Spanish, for that matter).
- Further information regarding Spanish gender can be found in this post.
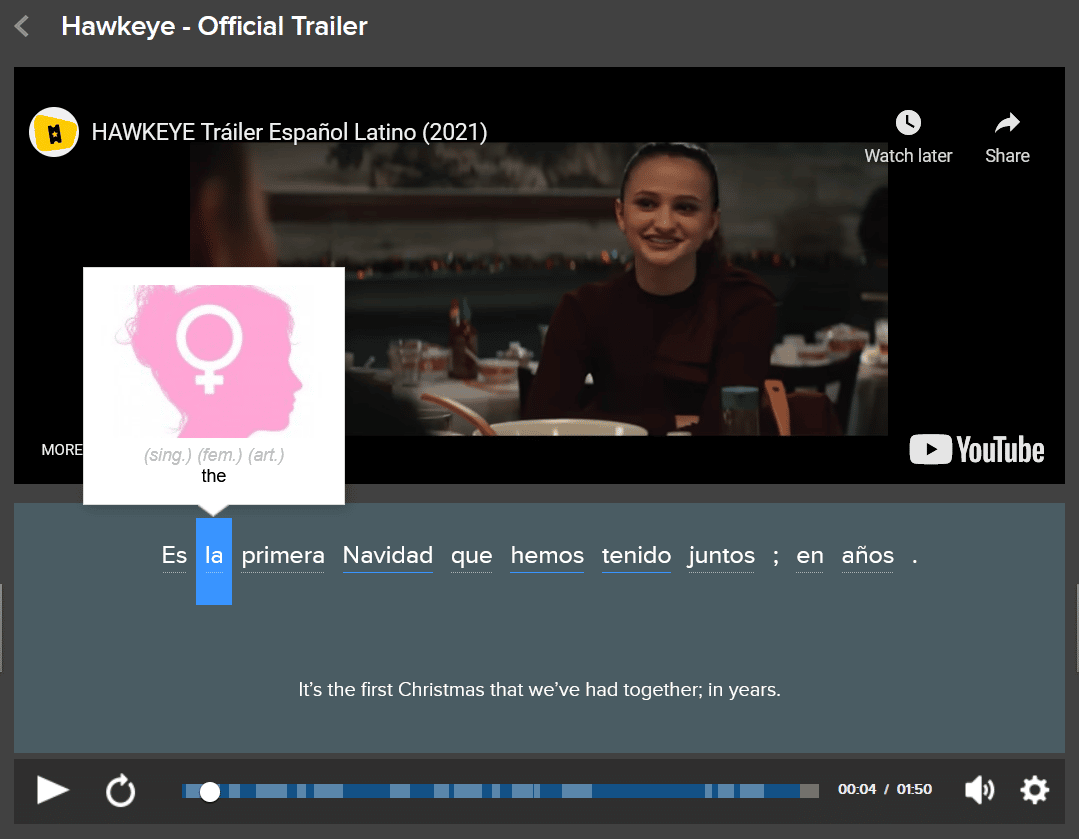
- You can help your students learn definite and indefinite articles, as well as other Spanish grammar and vocabulary, by letting them hear these terms in use.
With FluentU, for example, you can incorporate authentic Spanish videos into your lessons. The videos are made by and for Spanish speakers, come at multiple difficulty levels and include interactive, expert-vetted subtitles.

FluentU videos include everything from movie trailers to music videos to funny commercials and more. There are DIY flashcard decks and personalized quizzes, too, which you can assign directly to students and follow up on their progress all in the FluentU program.
Spanish Lesson Activity Ideas
There are so many Spanish learning activities out there. These could fit in any number of Spanish lesson plans. See what would work best for your topic and your students, then have some fun!
Create a “Langspo” board
“Fitspo” is a slang term for fitness inspiration. Motivational content is all the rage these days, so spice up your typical classroom display board by turning it into a Langspo board—a board that showcases inspiration for learning Spanish!
Have your students cover the board with pictures and quotes that will motivate them. They can use things like maps, pictures of Spanish-speaking countries and quotes about language learning.
Better yet, have your students discuss how to translate these quotes into Spanish. Have the correct translation ready, and explain why this translation is popularly embraced. Ask them to consider how the translation captures the essence of the quote.
Rearrange desks for different lessons
Experimenting with different desk arrangements can completely change the classroom and the learning experience. Change and flexibility allow for optimal student engagement.
Put desks in small groups to open doors to cooperative learning lessons and project-based learning. It’s also an excellent tool for differentiation, as students can be grouped based on ability. Similarly, you could arrange the desks face-to-face to allow students to work in pairs.
Don’t be afraid to try a classroom circle or semicircle, either! Seeing everyone’s faces often scares students at first, but then creates a feeling of belonging and “we’re in this together.” This setup is ideal once a week or a few times a month during conversation-based lessons to encourage full class participation and engagement.
Cover a wall with real-world Spanish examples
Have students find examples of Spanish in their daily lives, and designate an area in the classroom to display the things they bring in. This is a great tie-in to a lesson on Spanish culture.
The first time I tried this in my classroom, I wasn’t sure how it would go over. But my students were excited to go home and see what they could find. They brought in all kinds of things—food labels, advertisements, beauty product packaging, pictures of signs, etc.
Many students told me they had never paid attention to all the places Spanish was used, but because they were now learning, they started to notice. This activity is a great way to start off the year, especially with entry-level students, to show how prevalent Spanish is and to reinforce the benefits of learning another language.
Make a Spanish hand collage
Teachers are always looking for ways to display educational, fun, relevant content around the classroom that goes beyond the typical Spanish vocabulary posters. Displaying something that students made brought great success and character to my classroom walls.
Have students trace their hands. On each finger, they can write or draw a personal reason for learning Spanish or something they hope to get from the class. Arrange the hands in a circle to be displayed in the classroom.
For even more creativity, you can designate certain colors and arrange them in a rainbow, or make a simple stem and leaves from green construction paper and arrange the hands in a flower. This activity facilitates discussion about why we learn other languages.
Have students create visual flashcards
Flashcards are extremely helpful for visual students because they encourage word association. Rather than just putting the Spanish word and English translation on the cards, have students draw pictures to illustrate terms and create a concrete association.
Instead of drawing, you can also have students use an online flashcard tool such as Quizlet. Most sites like this are free and allow students to create their own set of flashcards, play games with their vocabulary and share with fellow students.
Ask students to create their own Spanish videos
Split students into groups and provide each group with a topic. Students can access many great resources for online Spanish content to learn and brainstorm ideas.
Students can create video clips explaining a difficult Spanish concept, come up with a skit to practice a short dialogue or create “how-to” videos about completing a task in Spanish.
Use art and graphic organizers
Get students drawing, painting and creating to make concepts more concrete. Find comics, cartoons, photos and posters to illustrate difficult concepts and help with student retention. Graphic organizers work great as well.
These materials help learners create a mental picture of the language. Even better, implementing art into a language-learning setting is fun and extremely effective!
Have students decorate their notes
Writing down what they learn and rereading it is extremely beneficial for learners—so, make it fancy to increase interest!
If you have a topic that lends itself well to note-taking, ask students to use highlighters, colored pens, stickers, etc. to detail their notes and make them more memorable.
Color code concepts
Simple, but so effective. When teaching sentence structure, always use the same color for each noun, a different color for verbs and so on.
You can even encourage students to replicate this color coding in their own notes for maximum benefit.
Cut up old Spanish magazines
Continuing with sentence structure, you can have students practice by cutting out words from Spanish magazines and gluing them onto a separate sheet of paper to build a sentence or phrase.
You may also choose to cut up sentences yourself and have students piece them back together—this works with more than just magazines, too! Either way, actively touching the words and moving them around will help students experience building a sentence in Spanish.
Another option is to cut out pictures from magazines and then have students write Spanish sentences to comment on what is happening in each picture.
Incorporate songs into the lesson
It’s no secret that songs are extremely helpful in language learning. You can use Spanish songs to make the class more enjoyable and help jog students’ memories.
Incorporate some fun songs for your young learners, or find some more age-appropriate options for older learners.
You can even have students create their own songs! For example, they can make up a rap, cheer or chant using Spanish vocabulary, or create new lyrics to an existing melody that explain a Spanish concept.
Have students read and talk out loud
Ask students to read stories or spell new words out loud for improved recall. It also helps to get them talking through communicative games. Pair off students and allow them to read out loud together or speak to each other in Spanish about a given topic.
When conversing, encourage them to not worry about mistakes and to learn from them instead. You may opt to provide lists of words they can try to incorporate into conversations.
You could also have students teach small portions of the class themselves, either in groups or (if you really want to challenge them) individually.
Consider recording lessons or activities
You may wish to record yourself teaching or providing directions for activities in Spanish and giving it to your students so they can listen again later for additional practice or clarity. Students could also use their own devices to record specific parts of the lesson.
A prime recording opportunity is introducing new vocabulary. Having a recording of you presenting the words allows students to practice correct pronunciation both in class and out.
You could even ask students to record themselves speaking Spanish as homework. When they listen to themselves, they may find it easier to identify errors and correct themselves in the process.
Act out words or sentences
Charades is always fun and always gets students laughing. Splitting the class into teams and having them act out new vocabulary lets them blow off a little steam and makes abstract Spanish words more concrete.
Similarly, you could simply ask students to describe everyday activities aloud while they act them out. For example, letting them act out tying their shoe or getting ready for school while describing what they’re doing gets them moving and speaking.
Get active with games
For younger students, you could have them spell out new vocabulary with magnetic letters in sand or in gel. Older students can also benefit from this and similar activities, of course.
Turning learning into a game is a sure way to ensure student retention. For example, turn the game Twister into vocabulary practice for parts of the body, colors and following directions. Or allow students to play Bananagrams or Scrabble in Spanish to foster word generation.
Another idea to get students up and moving around is to create a scavenger hunt by giving them a list of objects in Spanish that they must identify around the classroom.
Use Total Physical Response (TPR) activities
TPR is a language learning method that involves full-body movement and is based on the way children pick up their first language. It pairs listening and responding with action to help students internalize a foreign language.
Including TPR activities in your Spanish lessons can provide students with physical connections to the language, which is good for memory. It also gets them up and moving, which means they’re more engaged with the content.
Create learning stations in your classroom
Classroom stations can be a great learning tool with learners of any age. All you need to do is split your room into several areas, each dedicated to a certain aspect of the lesson. Then, split your class time into sections and give students a set amount of time at each station.
For example, if your lesson topic is ser and estar, your four stations could be: reading a short dialogue, highlighting each instance of the verbs and discussing why they were used; creating a graphic organizer about the differences between the words; watching a short video of native speakers using these verbs; writing a dialogue that incorporates both verbs with a partner.
Teaching beginners is actually not very different than teaching intermediate or advanced students. In fact, beginners tend to be very eager to learn.
Use these lesson and activity ideas by putting them into practice as soon as you can. They don’t require a lot of preparation on your part, and your students will enjoy them!
Download: This blog post is available as a convenient and portable PDF that you can take anywhere. Click here to get a copy. (Download)
And One More Thing…
If you've made it this far that means you probably enjoy learning Spanish with engaging material and will then love FluentU.
Other sites use scripted content. FluentU uses a natural approach that helps you ease into the Spanish language and culture over time. You’ll learn Spanish as it’s actually spoken by real people.
FluentU has a wide variety of videos, as you can see here:

FluentU brings native videos within reach with interactive transcripts. You can tap on any word to look it up instantly. Every definition has examples that have been written to help you understand how the word is used. If you see an interesting word you don’t know, you can add it to a vocab list.

Review a complete interactive transcript under the Dialogue tab, and find words and phrases listed under Vocab.

Learn all the vocabulary in any video with FluentU’s robust learning engine. Swipe left or right to see more examples of the word you’re on.

The best part is that FluentU keeps track of the vocabulary that you’re learning, and gives you extra practice with difficult words. It'll even remind you when it’s time to review what you’ve learned. Every learner has a truly personalized experience, even if they’re learning with the same video.
Start using the FluentU website on your computer or tablet or, better yet, download the FluentU app from the iTunes or Google Play store. Click here to take advantage of our current sale! (Expires at the end of this month.)

Engaging Topics to Talk About in Spanish Class with Your Students
Traditional Spanish conversation practice often involves generic topics that bore students, but we can do better. With the right topics…